Monday, December 27, 2010

Our Christmas Dessert: Homemade Peppermint Ice Cream & Hot Fudge Sauce

My husband bought me an ice cream maker a couple of years ago for my birthday. I made a few batches, wasn't super impressed, and it's been sitting up in my closet. My daughter, Kayla, kept telling me we should make ice cream again sometime. Earlier this month, I decided just to go for it and do it! We made Peppermint Ice Cream and the results were so good that we decided to make the ice cream (except a double batch) for our Christmas dessert this year! It was so nice having such good results with such a simple and easy recipe. It has made me want to try making ice cream more often. =)

The thing I liked about this recipe was that it didn't require cooking the base before freezing in the ice cream maker and the results still yielded nice and creamy ice cream. This recipe is so simple. The hardest part, IMO, is crushing the peppermint candies! We did it with a hammer. In the future I would like to explore other possible ways of crushing the peppermint candies.

Easy Creamy Peppermint Ice Cream
Adapted from THIS RECIPE found at
www.serving-ice-cream.com
Printable version HERE

Ingredients:
1/2 cup milk
1/2 cup half-and-half
2/3 cup sugar
2 cups whipping cream
3/4 tsp. vanilla extract
3/4 tsp. peppermint extract
2/3 cup crushed peppermint candies

1. Whisk milk, half-and-half, and sugar together until sugar is completely dissolved.

2. Add whipping cream, vanilla extract, and peppermint extract and mix with whisk until well combined. At this point, mixture can be stored in refrigerator for several hours if desired.

3. Pour into ice cream maker bowl/cannister. Churn ice cream for approximately 20-25 minutes or according to manufacturer's directions. At this point, mixture should be in a semi-frozen state. Add the crushed peppermint candies at this point (if you add them at the beginning, the candies will sink to the bottom).

4. Churn mixture with candies an additional 5-10 minutes or until you have achieved desired consistency. Transfer ice cream to a freezer-safe storage container and freeze to set ice cream.

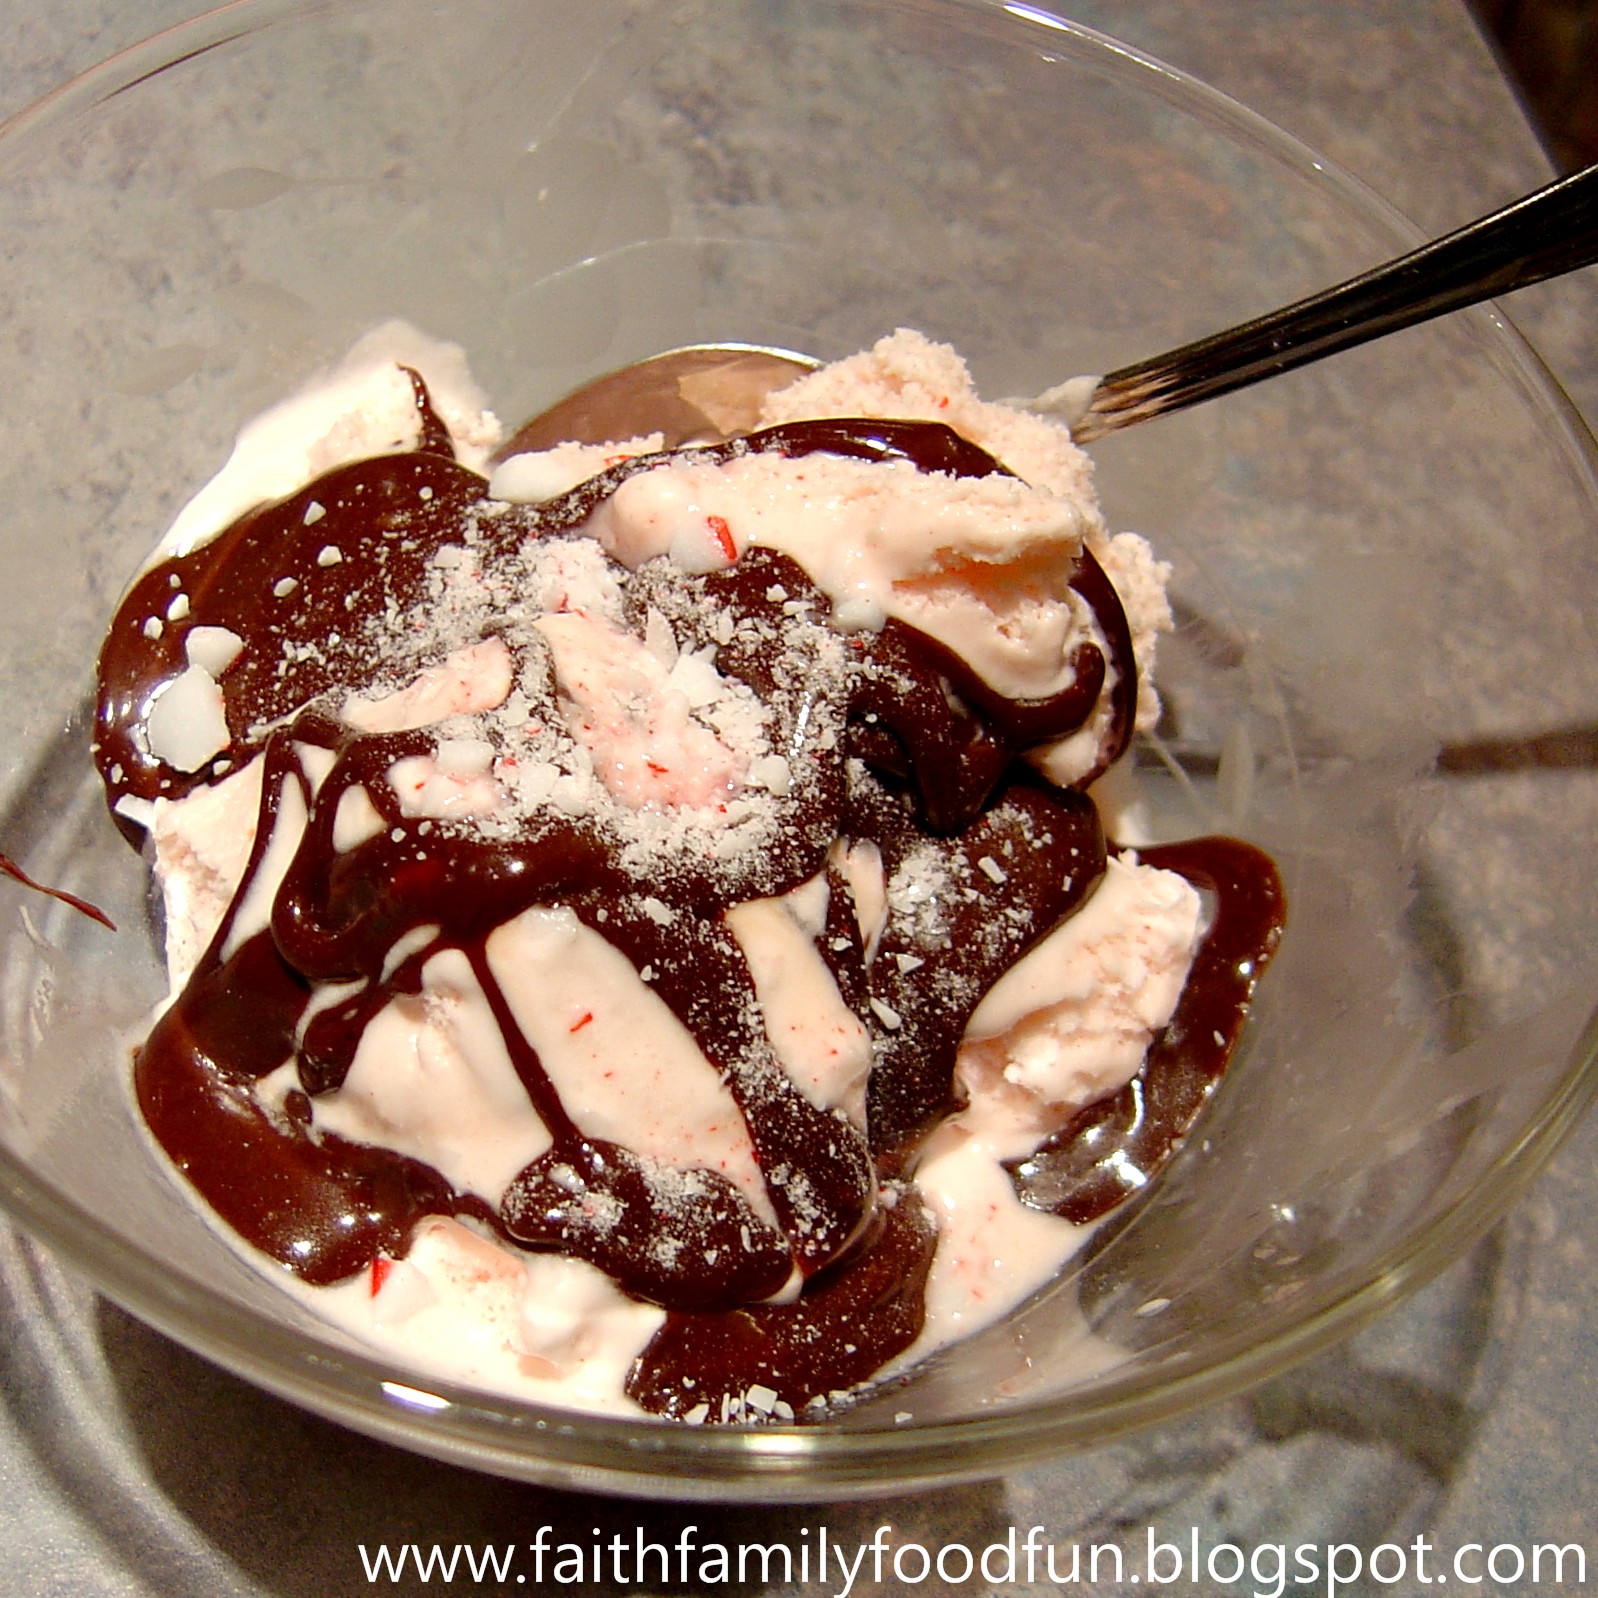
We topped our Homemade Peppermint Ice Cream with this super yummy (and easy) Hot Fudge Sauce from allrecipes.


Simple & Delicious Hot Fudge Sauce
Adapted from THIS RECIPE
from allrecipes.com
Printable version HERE!

Ingredients:
1 (14 oz.) can sweetened condensed milk
4 (1 oz.) squares unsweetened chocolate
1/2 cup brown sugar
dash or two of salt (approx. 1/16 tsp.)
1 tsp. vanilla extract

1. Combine sweetened condensed milk, chocolate squares, brown sugar, and salt in a small saucepan. Cook and stir over medium low heat until chocolate and sugar is melted, about 5 minutes.

2. Stir in vanilla. Remove from heat.

3. Serve warm over ice cream or dessert of choice. Store fudge sauce in refrigerator.

4. To reheat, place desired amount in microwave-safe bowl and microwave at 30 second intervals, stirring between intervals until sauce has reached desired temperature. A small amount of water can be mixed in if consistency is too thick.

Notes: This sauce was really good, don't get me wrong! But I think the next time I try it, I would like to add another ounce or two of chocolate to get a richer chocolate flavor. I may add a bit more vanilla as well.

This was definitely a departure from our usual Christmas desserts, but it was fun to try something new.

What did you enjoy for dessert on Christmas Day?

Photobucket
Linked up with Tempt My Tummy Tuesdays, It's a Blog Party Delicious Dishes, Tuesdays at the Table, Tasty Tuesdays, Delectable Tuesday, & Tuesday Night Supper Club.

Saturday, December 25, 2010

Merry Christmas!

I wanted to pop in to say Merry Christmas!
I made this card for my parents and brother
and thought I would share it with you.

I had fun designing it and putting it together.
I've been playing around with a stamping technique
called "Embossed Resist".
I used this technique on the snowflakes.
You can see that I embossed them
with clear embossing powder on white cardstock
and then sponged over them with light blue ink.
It creates a fun effect!

I colored my snowmen with inks and a blender pen.
I feel like such an artist with the results I get doing that!
I trimmed some white cardstock to resemble snow drifts
and set my snowmen over the cardstock
and set a snow layer over them on the bottom.

I had some fun with the ribbon.
I felt like doing something different,
so I did! =)

I just couldn't bring myself to put the greeting on the front,
so I just stamped the inside.

I hope you have a wonderful day enjoying your families
and those close to you.
be ever present with you today and in the New Year.
My mom wrote a wonderful post on the blog
that I co-author with her about "the rest of the story".

Photobucket

Thursday, December 23, 2010

Vacation Project

My husband likes to take a good chunk
of his vacation off during this time of year.
This year was no exception.
He has nearly 2 weeks off (including the weekends)
and it will so nice to have him home for all those days!

This year he has a special home improvement
project he will be working on.
When we moved into our home nearly 10 years ago,
we eyed the half-wall between the living room
and hallway as a possible place for storage in the future.
10 years later, we now have 3 children, we are homeschooling,
and our house with less than 1400 sq. feet is nice and cozy.
That extra storage area idea is now becoming a reality
and it will be great to have a little more storage space.

I thought I would share some pictures of what he started today.
My brother helped out with the work today,
which my husband was very grateful for.
Thanks, Dan! =)

BEFORE

Here's our hallway and the half-wall.
You can see where Gary cut a little hole
in the wall to scope out the inside.

AFTER


Here's what the hallway looked like
after Gary and Daniel started cutting.
It's a mess right now, but I'm looking
forward to the end result! =)

Anyway, that's what's going on here today.
I'll post more pictures as we go along! =)

Rejoice!

Photobucket

Monday, November 1, 2010

Random-ness

I read THIS POST on David Wilkerson's blog
and wanted to share it with you.
It's titled:
Very good encouragement
not just to think about,
but to apply and act on.

Right now, God is showing and teaching me
how to practice delighting in Him.
I really stink at it.
I'm serious.
But He is such a good and patient teacher.
He doesn't give up on me
and He's not letting me give up either.

Which reminds me...
I can't give up on other people, either.

Okay, so this post is a little random,
but it's what's on my heart as I'm writing.

Have a blessed day,

Blogger Templates

Saturday, October 2, 2010

A Decorating Tip

People that know me well are probably shocked with this title.
A decorating tip? From Adriel?
I'll be honest, I'm not very big on decorating
and my home is pretty humble.
It's not because I don't want to decorate.
It has more to do with that (a lot of times)
annoying thing we call "money".

I have this thought in the back of my mind
that it's somewhat wasteful to spend money on something
that is just going to sit and look pretty.
Am I alone?
At the same time, there's a part of me
that wants to have pretty things.
I think I'm just weird.

Okay, so enough about my issues
with home decorating.
I told you about a decorating tip
and I'm not going to let you down!

She lists eight fall trends and #6 got my attention:

"Pillow talk. Today's pillow designs offer an array
of textures, colors, shapes, sizes and accents,
and can completely transform a room's aesthetic.
Accordingly, pillows have become the ultimate interior design accessory.
Choose an assortment of pillows for the spring and summer,
and another set for the fall and winter.
This is an easy, budget-friendly way to transition a room
from one season to the next."


Okay, I think even home decorating handicapped little old me
can handle something like that!
Plus, she mentioned "budget-friendly".
I think some decorating might be in my future!

Have a wonderful weekend!
Blogger Templates

Friday, September 3, 2010

Goodbye August, Hello September!

In a way it's hard to believe that September is already here,
but in another way it seems that August was a very long month.
Life seems to be going by fast...
i n   s  l  o  w   m o t i o n.
That doesn't make very much sense,
but it's a feeling that is hard to explain.

Here's my month of August highlights!

We went to a Diamondbacks game.

The kids earned free tickets through
our library's summer reading program.
My brother came along with us. =)

Jacob celebrated his 8th birthday.

He made his own pinata with the help
of his sister and neighbors.
We ended up having a kid party,
a family party, and a party with the families we fellowship with.
I don't know how all that happened,
but it did, and that's all that matters. ;-)

The kids and I continued our 50 state unit study.
We covered Arkansas, Arizona, and California.
We spent lots of time in the kitchen making
a recipe for each of the states we studied.

Allison took her first dip in the pool!

I wasn't sure if we'd do that this year,
but it seemed like the right moment last week
and it's always cute to see a baby in the pool with a diaper. =)

I was able to spend some time crafting this month!

Here's one of the cards I made. =)

What was one of your highlights from last month?
Blogger Templates

Tuesday, August 31, 2010

Recipe for Beef & Spinach Shells w/ Creamy Tomato Basil Sauce

Wow! What a title, huh?
A tad bit on the long side,
but it could honestly be longer.
No kidding.

So I tried out my idea for this dish tonight.
I liked the flavor a lot,
but my original sauce was too heavy.
I revised the recipe based on my first impressions
and here's what I've got!

If you give it a go, let me know what you think! =)
Beef & Spinach Shells w/ Creamy Tomato Basil Sauce
Makes 10 stuffed shells or 4 servings

Beef Mixture:
1/2 lb. ground beef
1/4 cup finely chopped onion
3 cloves garlic, minced
1/2 C. packed spinach, fresh or frozen (if frozen, thawed and squeezed dry)
4 oz. cream cheese (regular or reduced-fat), softened
1/2 tsp. salt
1/8 tsp. pepper
1/2 C. shredded Italian cheese blend

Creamy Tomato Basil Sauce:
1 8 oz. can Roasted Garlic flavor tomato sauce
1 8 oz. can Basil, Garlic, & Oregano flavor tomato sauce
1/2 C. packed fresh basil, coarsely chopped
1/2 C. shredded Italian cheese blend
1/4 C. grated Parmesan cheese
4 oz. cream cheese (regular or reduced-fat), softened
1/2 TBS. sugar

Additional Ingredients:
10 large pasta shells
1 C. shredded Italian cheese blend

1. Bring large pot of water to boil and cook large pasta shells according to box directions. Drain, rinse with cold water and keep in pot with a small amount of cold water to keep noodles from sticking together; set aside until ready to stuff.

2. Brown ground beef in medium skillet; drain fat. Add in onion, garlic, and spinach. Cook for 5 minutes over medium-high heat. Stir in cream cheese, salt, and pepper, combining well. Remove from heat and allow to cool slightly before stirring in the Italian cheese.

3. In a small saucepan, heat both cans of tomato sauce over medium-high heat. When heated through, stir in the Italian cheese blend and grated Parmesan cheese until melted. Add the cream cheese, blending it into the sauce mixture (a whisk or a hand blender may be helpful). Add the basil and sugar, stirring to combine. Allow to simmer for 5 minutes.

4. Preheat oven to 375. In a medium baking dish, place a small amount of sauce in bottom. Drain pasta shells and stuff with beef mixture. Arrange shells seam-side up in baking dish. Pour remaining sauce over shells. Sprinkle the top with 1 cup shredded Italian cheese blend. Bake for 20 minutes, then place under broiler and broil top until cheese is slightly browned. Serve with a nice green salad and garlic bread!

Enjoy!

Blogger Templates
Linked up with:

Sunday, August 29, 2010

This Week's Menu in Adriel's Kitchen

Here's what's going to be on our plates this week!
Monday
Beef & Spinach Stuffed Shells w/ Creamy Tomato Sauce
(This is an idea in my brain...
I'll let you know how it goes.)
Salad
Garlic Bread

Tuesday
Roasted/Baked Chicken Breasts
(This is another idea... stay-tuned!)
Garlic Rosemary Red Potatoes
Fresh Sauteed Green Beans

Wednesday
Chicken & Steak Fajtas
(I've got yet another idea for a marinade!)
Mexican Rice
Refried Beans
Fresh melons

Thursday
Mongolian Beef
Red Curry Chicken & Green Beans

Friday
Leftovers
Blogger Templates
Linked up with:

Saturday, August 28, 2010

Yummies I'd Like to Try

I'm still in the process of getting life organized,
but I have made some progress.
We've been tracking along with school,
the house has been staying fairly clean
(a couple rooms are a work in progress),
most of our meals have been cooked at home,
and we've still managed to fit in some free time!

Right now I'm just maintaining necessary meals and such,
but here's a few yummies that I hope to try soon!

Okay, YUM! Must try this dipped in chocolate!!
Are these cute or what?!
I've been wanting to do some cut outs with the kids
and this dough looks really yummy.
I don't know if I'll be brave enough to try the icing
(it looks a little too complicated and time-consuming at the moment),
but we'll see.

I've got starter in my freezer!
I've never thought of making it this way, almost like a cake.
It looks super yummy!


I've wanted to try making donuts for a long time! Yummy!!
Blogger Templates

Thursday, August 26, 2010

Clouds in the Sky


Right now I am sitting at my kitchen table
looking outside and noting the cloudiness.
The kids were planning on swimming today,
but it doesn't look like that's going to happen.
Clouds during the summer here usually mean
T H U N D E R S T O R M S
(and I have heard some thunder).
Not too smart to swim in.

They have done a great job with school today.
Too bad I can't reward them with swimming.
They worked so hard to get done in time to go.
Sometimes life doesn't always go as we planned.
They're having really good attitudes about not going
and it is encouraging to see them honoring God
and pleasing Him even in the middle of disappointment.

My husband and I got some news today that didn't seem so great,
but I listened to my husband respond in a calm, controlled manner.
I saw him glance at the clouds and turn his gaze back to the Son,
and he spoke words of faith that I wasn't expecting to hear.

As a family, I see the Lord gaining ground in each of our hearts
one step at a time, little by little.

Thank you, Father.
Blogger Templates

Wednesday, August 25, 2010

Banana Coconut Bran Muffins

I had some overly, and I mean
OVERLY,
ripe bananas sitting in my fruit dish yesterday.
They were either going to get thrown away
or they were going to be used for baking.
Now, I haven't been the most ambitious person lately,
but I didn't want to waste those bananas
(although now that I'm writing this, I realize I could've just put them in the freezer).
I threw these together and they were yum, yum, yummy!
Thought I would share them with you.

Banana Coconut Bran Muffins
Makes approximately 2 dozen muffins

Recipe notes from Adriel: I used cooking oil in this recipe, but if I had had plain yogurt, I probably would've used that instead. Also, I made part of my batch without the chocolate chips and part with. Both are good and depending on my mood, I like it either way. Obviously, the chocolate chips make this more "dessert-y", but that's okay once in awhile! This would be good with nuts in it, too, but I didn't add them today. Maybe another time. Enjoy! =)

3 ripe bananas, mashed
1/2 cup applesauce
1/2 cup cooking oil
1 tsp. vanilla extract
2 eggs
2/3 cup packed brown sugar
1 cup flour
1/2 cup whole wheat flour
1/3 cup wheat bran
1/2 tsp. salt
1 tsp. baking powder
1/2 tsp. baking soda
1 cup flaked coconut
1-1/2 cups chocolate chips *optional*

1. Preheat oven to 350.

2. Mix the wet ingredients together in a bowl until well combined. Mix in the brown sugar.

3. In a separate bowl, combine dry ingredients (except for chocolate chips). Add wet mixture to dry mixture and stir together until combined. Mix in chocolate chips or any other additional mix-ins and stir to combine.

4. Spoon or pour batter into greased or lined muffin pans. Bake at 350 for 25 minutes, or until golden brown.

What I liked about these is that they were good WITHOUT butter on them!
That's a big deal for me, because I almost
never, hardly ever, can eat muffins without butter.
This makes them healthier for me
(and for anyone else who has the same problem keen sense of taste). ;-)
In addition, my daughter liked them a lot, too!
Kid-friendly!! Woohoo!!

Have a great day! =)

Blogger Templates
Linked up with:
&

Monday, August 23, 2010

Reminded Again

I had a hard time coming up with a title for my post today.
All the words I thought of just didn't seem to come close
to what is on my heart, but this title will just have to do.

A few days ago I was going through my texts on my phone,
because my text box was getting full and I needed to delete some.
In doing so, I ran across some texts from my husband from last year,
shortly after I had found out I was pregnant again.
They reminded me of something I had completely forgotten about,
but they took me back to that time and reminded me to thank the Lord.

We were pleasantly surprised when we found out
we were going to have another child.
It was just exciting!
But a short time after finding out,
there was a day when I had a decent amount of bleeding
and I thought I was losing the baby.
Thus the texts...

I don't remember all the details...
I think we prayed on the phone, but I'm not completely sure.
I do remember that the bleeding stopped that day
and here we are, several months later with a new baby. =)
It's always good to remember to return to the Lord to thank Him.
I'm just thankful for the reminder, because I forget so easily.

Bless Jehovah, O my soul, And forget not all his benefits.
Psalm 103:2
Blogger Templates

Friday, August 13, 2010

Crunch 'n Munch Jacob style

I was typing yesterday's post and eyed my son
eating his Crunch 'n Munch.
Instead of chuckling to myself
and enjoying the moment all alone,
I grabbed the camera and snapped this shot.


He was eating the last of the Crunch 'n Munch
and wasn't going to let those tasty crumbs go to waste.

He caught on to me, though,
and realized I was taking pictures of him.
Then I got a few more...


After our photo shoot, he took another bite/lick
(whatever you want to call it)
and said loudly,
"Can someone get me a drink of water?!
It tastes like a stinky nut!"
He then proceeded to run to the kitchen sink
and try and rinse his mouth out.
It was humorous
and because he wasn't dying or anything,
I just sat in my seat and observed the moment.


So thank you, Crunch 'n Munch,
for adding a little humor to my
otherwise ordinary lunch time.
It was worth the $1 I spent on you. =)
Blogger Templates

Thursday, August 12, 2010

Today...

I'm working on some new schedules for life!
I told my mom the other day
that I need to take a whole month off
to re-organize my life.
Well, not really, but that's what it feels like.

Nursing a baby is practically equivalent
to a full-time job... time-wise, that is.
But now that we're approaching
3-months old, I'm anticipating feedings
not taking quite so long?
(Yes, that's a hopeful statement in question!)
The thing is, a baby's schedule
changes every week or so.
My schedule is going to have to be flexible,
but I definitely need something
to help me know where I'm going in a day..
Do you know what I mean?

In addition, my kids need a schedule
for their day as well
to see where they are going
throughout the day
and to make sure we stay on task
to get done what needs to be done.
Since I can't be as involved minute-by-minute
right now, it's important that they have
a schedule that tells them what is expected
and to give them some basic
time management skills.
This will be good for them in the long run
on becoming more responsible in their time.

I don't want to wait until
I'm absolutely desperate before
I put an action plan into place.
So I'm starting now and will
hopefully get these schedules done...
right now I'm having a problem with Excel
not doing what I want it to do.
Fortunately, I have a techy husband
who will be able to help me later. =)

Do you have any tips on organizing
that you can share with me?
I'm open to suggestions! =)
Blogger Templates

Wednesday, August 11, 2010

Sweeter Than Chocolate Bible Study

Quite a name for a Bible study, no?
I think the name is great!
Especially since I LOVE chocolate!

I've done a few studies through Precept Ministries
on various topics/books of the Bible.
I always get so much out of them
just by reading the word of God!
I know that sounds simplistic,
but it's true and these studies
really let the word teach the word.
You don't have people putting their opinions in
and manipulating the words to prove their point of view.

They actually have a Bible study series for children
I have done 2 of them with my kids.
We just finished the study on James titled,
"Boy, Have I Got Problems".

But back to Sweeter Than Chocolate...
I just ordered 2 of these studies -
One for me, one for my mom.
My mom really likes doing these Bible studies
and I thought it would make a great gift
for her birthday coming up.
(Don't worry about her knowing, she already does.)
Precept is going to be starting an online Bible study
I was excited to see this,
because they did an online Bible study
for the Sweeter Than Chocolate Hebrews 11
during the summer and I wished I had known
in time to order the book and everything.
Anyway, I'm looking forward to starting this study
and getting to do it with my mom.
She's more than just my mom,
she is a very special friend
and I love her very much.

For now, I've got the free study guide
for Jeremiah Pt. 2 that I need to finish.
If you're looking for something
to help you study God's word more in depth,
and you'll find links for listening/watching
Kay Arthur and free study guides on
a number of books of the Bible
and topics that you can download.
This is a great place to start if you're
not sure this type of Bible study is
something you want to spend money on.
However, the money you spend is well worth it!
What you get is
Sweeter Than Chocolate!

Enjoy your day! =)
Blogger Templates

Tuesday, August 10, 2010

50 States Unit Study + Recipe

You may remember THIS POST
where I was trying to decide
if I should take the plunge
and do a 50 States unit study
with my kids or not.

I decided to go for it
and we've been enjoying our study so far.
We are doing the states in alphabetical order,
trying to study one state per week.
We have to take a little longer
for a state a couple of times,
but we've been doing pretty good staying with it.

One of the activities that we do for each state
is choose a recipe that has something
to do with that state
(using an ingredient grown in the state or a traditional recipe from that state),
and we make it together.
I take pictures as we go through it step-by-step
and then I print up the pictures
and the kids write about how we made it.
This goes into their 50 states notebook,
along with a copy of the recipe.

We're a little behind making a recipe for Arkansas
(which we studied last week).
I was planning on making a rice dish of some kind
since rice is one of the major crops grown there,
but Kayla wanted to make
Tater Tot Casserole
(a recipe from the Duggar family),
because the Duggars are from Arkansas. LOL!
I thought that was pretty cute
and since we haven't yet tried Tater Tot Casserole,
I think I will oblige her. =)

Today I'm sharing what we made for Alabama...

Blackberry Swirl Cake

Ingredients:

1 box Yellow Cake Mix
12 oz. fresh blackberries
1/3 C. sugar
2 TBS. flour

1. Prepare cake mix according to box directions. Pour cake batter into a greased 13x9-inch baking dish.

2. Mash blackberries with sugar, leaving some larger pieces of berries. Mix in flour. Place spoonfuls of berry mixture in a varied pattern on top of cake batter. Run a knife back and forth, up and down to “swirl” in berry mixture with cake batter.

3. Bake at 350 for 50-60 minutes. Allow to cool before serving.

Yummy fresh blackberries!


My two personal chefs. =)

Finished masterpiece!

What kinds of activities do you like to include
in your homeschooling to make learning fun?

I'd love to hear your ideas!
Blogger Templates